Wednesday, June 30, 2010

Bargain Shopping/Item Remake - Part 1

I recently went to my local Hobby Lobby store for one thing and came out with three full shopping carts of things. They had a ton of their housewares on sale for 80% OFF to make room for...are you ready for this...Christmas.

So, like I told my husband, I spent a lot, but I can't even explain how much I saved! :)

Here are just a few of my bargains (more to come in future Before/After posts).

This frame is HUGE--5' x 2.5'. It's aluminum/tin/? some rather light metal. And I'm sure at one time had something in it since the before cost was $199.99. I paid $40! (It's hanging in my hallway so it's sort of hard to get a great picture of it.)

The metal rings inside were each $.99. I have no idea what they are for. I was going to use them as wreath forms for rag wreaths, but I decided to try them in my huge empty frame and I like them there. I tied them with torn strips of off-white cotton fabric. Around the holidays, I'll take the metal rings out and hang berry wreaths in this frame.

And if I ever get sick of it in my house, it's great for outdoors too since it's metal. See, win-win! :)
This mirror has a thick plastic frame around it that looks like wood. There is a broken part on the bottom (that you can't see at all with it hanging this way) so it was marked down to...$18! I brought it home and roughed it up a bit to make it even more distressed and I love it over my piano.

That's it for today. More to come...

Tuesday, June 29, 2010

Jersey (Sea Anemone) Pom Pom Tutorial

This fun little pom pom made from jersey knit fabric would make a fun pin or gift topper. Here we make it into a hair clip. Doesn't it sort of look like a sea anemone? :)

Supplies Needed:
Knit Fabric (I used my leftovers from this scarf)
Cutting mat and rotary cutter
Clothespins
Pom pom maker or piece of cardboard
Small piece of felt
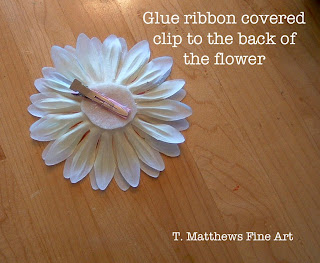
Alligator clip (covered with ribbon)
Glue Gun
Scissors

Step 1 - Cut the Fabric
You don't need a lot of fabric but it does help if it's rather long so your strips are continuous. This makes them easier to wrap. My strips ended up being 3/4" wide and 2.5 yards long.

I found the best way was to fold it over several times (notice your edge is curling--you want that, but it's hard to cut this way). I clipped the curled edges as flat as I could with some clothespins and cut off the ragged edge and discarded it.


See that nice clean, edge! I then cut 3/4" strips.

TIP - When I was all through cutting the strips, I pinned my fabric because I can never get this nice of a straight line with knit! I'm storing the fabric this way for the next time I need to cut it.
Step 2 - Stretch the Knit to Curl Your Strips
Go through all your strips and pull them gently to get them to curl in on themselves. You'll see. It's like magic. (FYI: You can also knit with the strips once you've done this to them. See my t-shirt purse at the bottom of this post.)
Step 3 - Wrap Your Pom Pom Maker
I have the Clover XL Pom Pom Maker, but you can use your favorite method--a rectangle of cardboard works fine.  (I found the Pom Pom Maker on e-bay.)

I used almost 2 full 2.5 yards long strips on each arm of my pom pom maker. You can adjust this to suit your needs. 
Step 4 - Cut the Fabric and Tie The Pom Pom
I used a thin strip of knit to tie it off and that worked well.
Step 5 - Trim It Up and Glue a Felt Circle to the Back
Step 6 - Glue an Alligator Clip to the Back
And you're done!


Monday, June 28, 2010

They're Baaaaack

This is the first time I've ever made them, but I know they aren't new. Yo-yo's are back in a big way and I, for one, am happy about it. They are fun, quick, and easy!

These three have alligator clips on the back to use as hair bows or even a lapel pin. (My daughter sometimes just clips the alligator clip to the strap of a tank dress).

The blue fabric on the blue and yellow one is from an old doll stroller that we just decided we could part with (even though it's been broken for years). I cut the seat part off of it because I love the fabric. It was just enough to make this yo-yo and maybe one more smaller one. I love finding new uses! :)

Sunday, June 27, 2010

Here's What We Do...

When the boys are away. :) The boys of our house were away at Scout Camp this week. So my daughter and I had "Girl's Week". Part of Girl's Week is always crafting. We pulled out our Dollar Store and Walmart flowers and went to work making these hair flowers.

My daughter picked out the ones she wanted and the ones to send to her cousins.

 One quick thing, these two were both made from the same exact kind of flowers. Just layered differently. That's the fun part--trying different designs and combinations until you get what you like. Then choose the beads or buttons you want for the center.

Saturday, June 26, 2010

A Relief Effort

A little while ago I got an e-mail from my sister where she admitted to almost buying some hair bows for my niece. Buying?!? Uh, no. So "Hairbows for Haley" was started. :)

My daughter went through her bows and chose some Haley might like. Recycling--this is a green effort! And then we made her some new ones. (Stay tuned for a tutorial on the turquoise one).

It was fun to send off this fun little package to my sweet little niece!

Newest Name Signs

Child Name Signs and Teacher Name Signs are always available in my bumblebina ETSY shop.

Tuesday, June 22, 2010

Nibblefest - A Dog's World


The theme for this month is A Dog's World. These three fun little cards are available now on e-bay with a starting bid of just $.99!

*SOLD

Newest Teacher Name Sign


And here's to you
Sorry, couldn't resist. :)

Monday, June 21, 2010

Why

am I knitting a wool scarf in the middle of summer?

Because this pattern totally caught my eye and I HAD to make it. Can't wait to wear it...in a few months.

Pattern: Just Enough Ruffles
Yarn: Cascade 220
Needles: US 10

Friday, June 18, 2010

4th of July Centerpiece with Fabric Pom Poms Tutorial

Just got my new Clover XL Pom Pom Maker. It is so fun! I've make pom poms with tulle, yarn, and fabric.  I specifically bought it to make fabric pom poms. I saw them here on Prudent Baby and loved them.

I made mine with red (striped cotton blend), white (cotton) and navy (polyester) fabric for a fun 4th of July centerpiece.

A few tips for the fabric pom poms:
1. At first I was really careful to wrap the fabric flat so there were no twists. Well, then my pom poms looked like stacks of fabric--not puffy pom poms. So as you wrap either your pom pom maker or whatever else you use, let the fabric twist and overlap a bit.
2. I cut the fabric into 3/4" wide strips. You could certainly go thinner, but thicker may make it harder to tied the knot around the center. I just cut them as long as my fabric and then overlapped them as I wrapped them onto the pom pom maker.
3. I tied these with matching yarn. It seems to tie a tighter knot than other things I tried.
4. For a solid color pom pom, it's best to use solid fabrics or fabrics that are printed on both sides. You can use cottons that are printed on one side. It just gives it a different look--more homespun/country.

To Make the Centerpiece:
I just stuck dowels into the yarn at the center of the pom pom. I didn't even glue them  because I use these dowels for other things. I put floral foam in the bottom of a pot I already had. Again, I just stuck it in and didn't glue is since this pot is usually my pencil holder by my computer. I stuck the dowels in the foam at different levels and filled in the top with floral moss. No glue, just tucked it in. A little jute bow around the pot finishes it off nicely. And everything is removable after the holiday. :)

I tried the pom poms outside first in my planter, but I thought they sort of got lost in the mix. I'm thinking of taking out the pinecones and filling the entire planter with floral foam so I can add all sorts of fabric flowers and pom poms. What do you think?

Wednesday, June 16, 2010

Rag Wreath for 4th of July


I've been seeing these everywhere online and I love them. So I had to make my own. And with the 4th of July just around the corner, red white and blue was my theme.

I bought 2 wreath forms. The green one is for a future wreath for my daughter's room. For this Patriotic Wreath, I used the 12" craft ring (macrame--anyone remember that?). The benefit of the craft ring is it's $1.99 (the green floral form was $3.99). And with the thin metal ring, you don't have to have very long strips of fabric--I cut mine to be just 8" long. I will have to cut them quite a bit longer when I use that green wreath from!


I got 2 or three styles of fabric in red, white and soft blue. I used some printed cottons (the whites do have a slight print to them), gingham, solid linen, seersucker, striped, polka dot and solid cotton.

I ripped the fabric into strips of varying widths--from 1/2" to 1-1/2". I then cut them down to be 8" long, using pinking shears to give the end a bit more interest and to avoid more fray. I tied the strips on in good ol' American Red, White and Blue order varying the fabric each go around.

The wreath is hung by a long strip of gingham torn fabric.


Tuesday, June 15, 2010

New Hair Flowers


I found a $3 4th of July artificial flower arrangement at Walmart today. It was awful! But I knew for $3 I could make something fun with the flowers.

I made both of these hair flowers using this method. The Patriotic Hair Flower if for my daughter. I just layered 3 of the flowers from the arrangement and used 3 beads in the center. She's excited to wear this for the 4th of July. The white and pink one is for my daughter's friend. The white is from the Walmart flowers. I then layered a soft pink one, a soft cream and a pink button. Very feminine! I still have 4 flowers left from my bargain arrangement--$3 well spent!

ETA: 06/21/10 - I went back to Walmart and the Dollar Tree and bought more flowers... :) More hair flowers are coming.

EBSQ Art Meets Blog

I'm the EBSQ Blogger of the Week over at EBSQ Art Meets Blog!! Check it out if you get a chance.

Sunday, June 13, 2010

Kid's Crafting - Cereal Box Cash Register

Using this post from Pane, Amore e Creativita as a guide, my daughter turned two cereal boxes into...


This fun cash register. My son printed the money for her. Not sure where he found those files. Should I be worried? :)


Saturday, June 12, 2010

Silk Flower Hair Clip Tutorial


My daughter and I got a little crafty this week and made some hair flowers for friends and cousins. Here's a quick tutorial on how to make them.

Supplies:
Silk Flowers (ours aren't silk, but what else do you call them?)
Alligator hair clips
Buttons or beads
Glue gun
Needle and thread
1/4" -1/2" wide ribbon
Small pieces of felt 

Step 1 - Take the flowers apart removing all the plastic centers and stems and backs. You can discard these. You don't need them for the hair flowers.
Step 2 - Layer the flowers together the way you want them. For this one, we did 3 different sizes of flowers on one hair clip.
Step 3 - Sew the button on. We topped this one off with a small pink button. You can also used beads. Sew a felt circle on the back as you're sewing on the button--creating a button, flower, felt sandwich.
Step 4 - Since the felt is only held on by a couple of stitches, tack it with some more glue around the edges.
Step 5 - Attach the alligator clip. I like to cover the top of my alligator clips with 1/4" ribbon. This helps it to stick to the felt better.
Step 6 - Wear it proudly!

LinkWithin

Related Posts with Thumbnails