 This may be a common site where you are, but for us in the Southwest, it's rare. There is just something so pretty about snow on berry bushes! And I can appreciate it so much more now that it is such a rare occurrence! :)

A little drawing, a little painting, a little crafting, a little knitting...
Wednesday, December 30, 2009
The Weather Outside IS Frightful
This may be a common site where you are, but for us in the Southwest, it's rare. There is just something so pretty about snow on berry bushes! And I can appreciate it so much more now that it is such a rare occurrence! :)
Tuesday, December 29, 2009
2009 - The Year of the Washcloth
Sisters, mom, sister in law, friends and a new mom got these for gifts this year. It was "The Year of the Washcloth". I love gifts that are pretty and useful!
Now I have to decide my theme for 2010...


+ecru+packaged.jpg)
Holiday Knitting

These little Wrap Me Up Puppies from Susan B. Anderson's Itty Bitty Toys were a kick to make and so hard to put in the mail! But I knew my nieces would love them so off they went to be adopted by 3 of the sweetest little girls I know! I've been told that these puppies are VERY loved and are constantly wrapped up, carried around and snuggled with. Yea!!


And this fun little pouf top hat was an order from the Cortez Craft Fair. I had a hat there for sale, but not the right size. So this one went in the mail and made it there in plenty of time for Christmas. So sweet.


Friday, December 18, 2009
The Last Ones of the Year


 Some of these were for my kids' teachers and some of them were orders that went out this week.
 Name signs will be available again after Christmas in my bumblebina ETSY shop.
Monday, December 14, 2009
Newest Teacher Name Sign


 These signs all went out last week. Teacher Name Signs are always available in my bumblebina ETSY shop.
Thursday, December 10, 2009

Wednesday, December 9, 2009
The Stocking Was Hung...

I made only a couple of changes. I did sew mine on my machine. I like the idea of gluing it but I didn't want to have to wait for the glue to dry. (That's how patient I am!) :) I traced an existing stocking and used that as my "pattern". I also just used fabric I had on hand--as usual, my goal/challenge is to try to use only what I have on hand. So the stocking and one flower are made of burlap and the other two flowers are a pretty tan gingham.
Friday, December 4, 2009
Text Block Tutorial - Christmas Blocks

Supplies:
Scrap wood
Scrap printed paper
Paper cutter
Acrylic paint
Mod Podge (I use Matte)
Foam Brushes
Sandpaper or belt sander
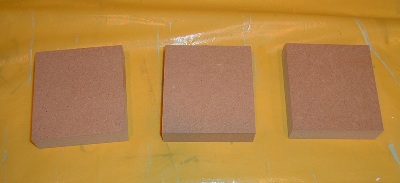
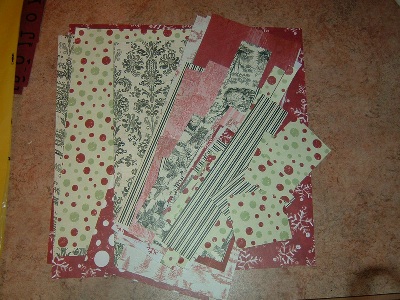
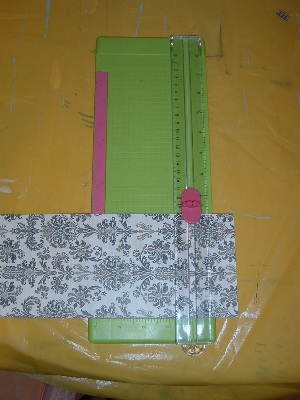

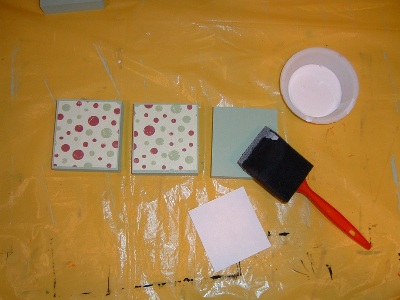
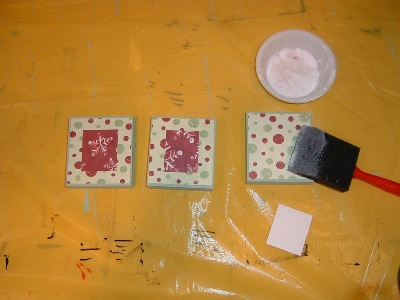
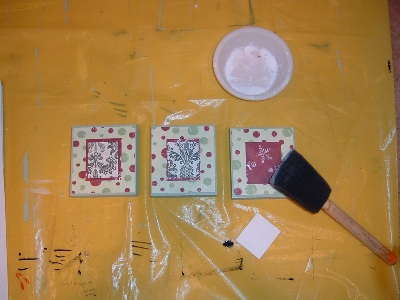
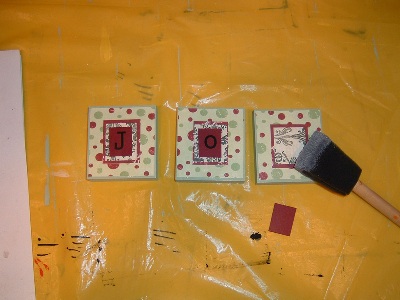
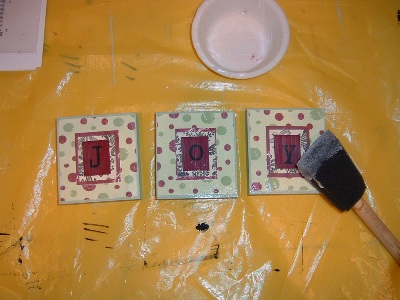
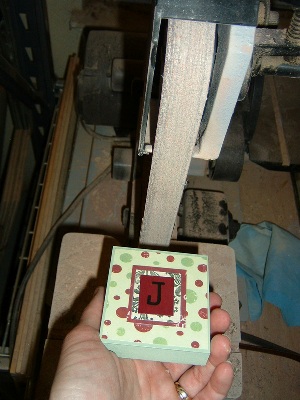
Voila! You’re done.
If you decide to make these, send me a link so I can see!
New Name Signs on their Way

 These two went in the mail this week. Teacher Name Signs and Child Name Signs are always available in my bumblebina ETSY shop.
IF - Crunchy

Pears are often described as crunchy, sweet and delicious. I even came across a recipe for a Crunchy Pear Crumble that looks divine!
Thursday, December 3, 2009
Recent Knitting Projects
As every knitter or crafter knows, you have to think ahead. Christmas knitting? Start in September AT THE LATEST. You hear news that someone is expecting. I NEED to know the sex of the baby as soon as you do! :) (Gotta know if I should use pink or blue yarn.)
My Santa and Christmas Countdown signs have been in the works since Halloween. It's the way it goes.
So...here are some somewhat recent knitting projects that have gone to the recipients and can now be posted.
 These little boy hats are so sweet. Both are newborn size. One was for a friend from church one is for my new nephew. For this I sort of just made them up as I went using a photo of another hat as a guide. If you're interested in the pattern, let me know.
 This little punkin was just for fun and is a really fun pattern from Permission to Unwind. I only got one in before Halloween but I'm sure next year I'll be making more.
My cousin's daughter fell in love with this little gal. So she lives there now. For the snowman, I used this pattern only half-ing everything to make it small (about 5" tall). I made up the hat pattern cause I wanted her to have a kicky beret.
 And this is a project I've had on my list forever. This Gathered Scarf is GORGEOUS if I do say so myself. It's a fantastic pattern from Bag 'n' Trash! I made one for me and one for my Mother-in-Law for her birthday. I changed the pattern a bit to make it a little more bulky (less lacey). If you'd like details, let me know.
And this little guy is from a pattern from Little Cotton Rabbits. (I LOVE everything she designs!) Not sure where he's headed. I already have the cupcake pincushion but I may not be able to part with him. He makes me smile! Doesn't he look so serious about the job of holding pins?
That's it for now. There's more, but they haven't reached their new homes yet. So I'll post them later...I've always got at least one knitting project going.
What's on your needles?????
Inspire Me Thursday - Handmade Holiday
 Handmade Holiday is what Christmas is about! This fun sign is available in my bumblebina ETSY shop along with several other styles.
*SOLD*
Tuesday, December 1, 2009
New in the shop - bumblebina ETSY

 More chalkboard stuff! This time gift tags (several sizes and quantities available) and a crazy fun tic tac toe board that I am totally in love with.
Available in my bumblebina ETSY shop.
Note: Tic Tac Toe Board has SOLD
New Signs
+09.jpg)


 Some of these are orders from the Cortez Craft Fair, one is an ETSY order and one is for my brand new nephew!!
Teacher and Child Name Signs are always available in my bumblebina ETSY shop. There are also several countdown to Christmas signs in the shop too!
Subscribe to:
Posts (Atom)