We began class with a set of instructions. I didn't tell the girls ANYTHING about what we were doing today. When the girls arrived there was an envelope at their spot with the following instructions inside...I called it a Mystery Drawing.
INSTRUCTIONS:
No talking. Don’t
look at anyone else’s drawing and don’t let anyone see your drawing. Don’t
worry THIS IS NOT A TEST! :)
Draw two circles right next to each other—like a number
eight lying down.
Draw a circle inside each of the first circles. Draw a black
dot inside those circles.
Draw a bib shape below the lying down number eight.
Draw a triangle pointing down right below the lying down
eight, right in the center.
Add two small triangles (points up towards the top of the
paper) above each of the circles that make up the lying down eight.
Add an inner bib shape the same as the one before only
smaller.
Add three tiny elongated circles at the bottom of the large
bib shape—do this twice, once on the left and once on the right.
Add a straight line directly under your drawing.
NAME THAT OBJECT…WHAT DID YOU DRAW?? (shhh, don’t tell anyone yet).
They came pretty close for the most part. And once our theme was revealed, it was time to reveal our treat for today--Owl Cupcakes.
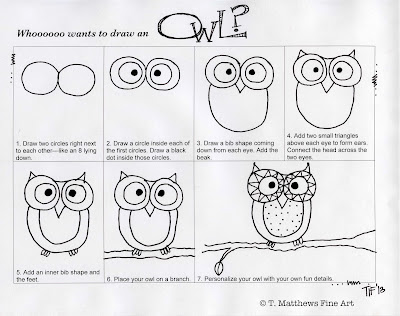
We then drew the owl together using the same steps, but with me doing them with them on the white board.
Here's our handout for the basic owl:
We then talked about all the ways you could change or enhance this basic owl. Here are just a few ways:
Here's one of the girls' cute owl drawing:
We then dove into the sculpture part of our class today. We made metal owls.
These are really fun and leave so much room for personalization and creativity.
Here's what you'll need:
You'll also need a drill if you want to hang them and add the wire feet at the bottom. I tried just gluing the twig at the bottom, but wiring them is your best bet. The glue just won't hold the wood to the metal lid.
I found that E6000 works really well for this. The girls assembled their owls and brought them to the "Gluing Station" where I helped them glue all the pieces together. I also did the drilling for the top hole and feet holes.
Basically you put glue on both surfaces (for instance, the eye and the spot on the body where they eye will go), let it sit for 2 minutes and then stick them together. They hold pretty well after about 10 minutes and will be set after about 24 hours. I had the girls carry their owls home on cardboard pieces and instructed them to set them aside somewhere to cure until tomorrow evening.
And here are their finished owls...
We also did some Owls on masonite tags using large buttons as the body...
I love that some of them took the pieces I had in the "Beak" bowl and used them for wings. Such creative girls!!
We were busy, busy, busy today and the time just flew by. It was fun!
See you next month for our Christmas Class.


So awesome. Love the owls. My kids loved drawing them, and maybe next time I'll get brave and let them sculpt ones too :)
ReplyDelete