Showing posts with label First Friday Art Class. Show all posts

Friday, May 1, 2015

First Friday Art Class for May 2015 - Paper Beads and Bows

Today we made 3D objects out of paper. We began by talking about several different types of paper. This is by no means an all inclusive list--there are so many types of paper out there. But this list is some we have worked with in the past and some we'd be working with today. I wanted the girls to start thinking about how to choose the best paper for the job.

Today we'll be folding and rolling paper to make bows and beads.

I made this little handout so they could not only see, but feel the papers I'd be talking about:
So let's talk about each one for a bit...

Copy/Printer Paper - this paper is ideal for photocopies and printers (of course), but it's also great for many paper folding projects. It's not too stiff yet holds its shape quite well. We used this to make the pink and blue bows pictured above.

Book Pages - book pages tend to be a bit thinner than copy paper so if you paint or use ink on them, you have to be careful. Book pages are readily available and can be used to create really lovely items. Book pages are also great for paper folding projects. We didn't make any bows with the book pages today, but if we had they would have been really pretty. Several of the girls did make beads with dictionary pages today.

Origami Paper - great for origami--obviously. The beauty of origami paper is that you can have one color on one side and another color (many times white) on the other and yet the paper is still very thin and pliable. A bit too thin and pliable for our use today.

Scrapbook Paper - called scrapbook paper yet used for SO many other things. I have a bit of a....obsession collection, shall we say, of scrapbook paper. It's about the same weight as copy paper though the weight does vary. For our purposes today we're using lots of scrapbook paper but making sure the weight is on par with copy paper. Notice the spotted paper to the right of the words "scrapbook paper". I tacked that little piece on so the girls could see and feel that some scrapbook paper is closer to card stock than copy paper in weight. That paper is double sided with a gorgeous aged purple on the back. Generally double sided scrapbook paper is rather thick and not good for paper folding projects.

Card Stock - We've used card stock a lot in the past. We drew our Koi Fish on card stock and then mounted them on a piece of colored card stock. We love card stock! But not for paper folding projects. It's just too stiff. It's hard to fold and can sometimes almost crack as you fold or roll it.

Watercolor Paper - this varies in weight considerably. Great for ink and watercolor. We loved it when we made our Inchies! Not great for folding and rolling. I wanted the girls to feel the thickness and talk about why paper that thick just wouldn't work for what we're doing today.

With that brief discussion of types of paper, we dove right in to our projects. I showed them both projects--the bows and the beads--from start to finish so they could then work (somewhat) independently and at their own pace. It was good to have the bows to work on while they waited for the Mod Podge to dry on their beads. Most of the girls took extra templates of the bows home to make more when they got home.

We made paper beads using this exact method from Kristy Neale found HERE. I had templates cut out for the girls to make things go a bit smoother. For wider beads they chose the 8" x 1-1/2" template. For beads that were a bit narrower they chose the 8" x 1-1/4" template. Once the beads were done, the girls painted a light coat of shiny Mod Podge on them. Then when that was dry they strung them on cotton string.
Here's one of the finished necklaces:
It was fun to watch the girls pouring over my scrap paper box putting different patterns and colors together to plan their scheme for their beads.

Our second project was paper bows. We used the template from How About Orange found HERE and also the template from Lia Griffith found HERE. I like the finished shape of the How About Orange template a bit better, but Lia Griffith's site has several different sizes on one page which is awesome.

We used the How About Orange template to make the plain pink, plain blue, and gold bows and the map bow. We used the Lia Griffith's template to make the pink polka dot bows. (The tiniest one is SO cute!)
A few tips on the bows...you can print the templates on regular copy paper, glue the WHOLE page down onto a sheet of card stock or a file folder, then cut out all the shapes. This gives you a template you can trace and use over and over. Or as in the pink polka dot bows, I printed the template on the back of a sheet of scrapbook paper and then just cut them all out.

We used clothes pins to hold the center while the glue dried and while we cut out the next piece. This will make your bow making much easier!!
These bows are very, very simple to make and the finished product is quite lovely. They'd be so pretty on top of a simply wrapped package.

Not a lot of "action shots" today as these were such hands-on projects. Most of the time I was helping to roll beads or string beads or choose paper with the girls.

We had a great time and it was a great way to end our 2014-2015 session of classes!!


Monday, April 27, 2015

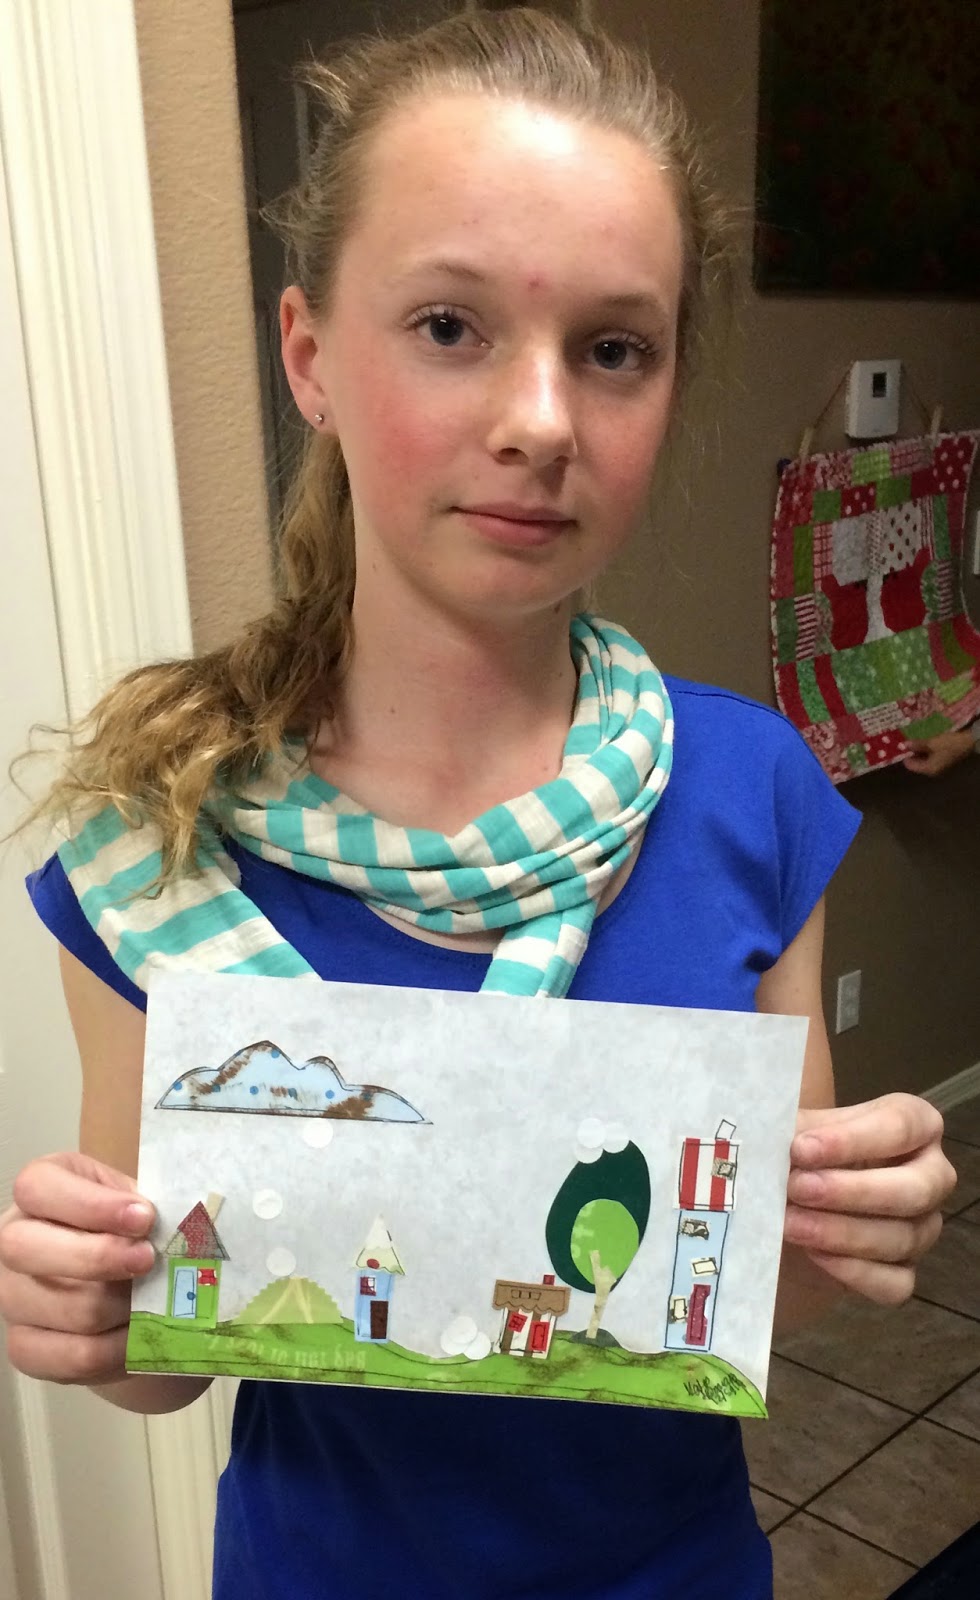
Line and Color Houses - the work of one of my art students

One of the darling girls from my First Friday Art Class came running out to the car to show me her drawing when I was dropping my daughter off at her house for a piano lesson.

She and I had discussed taking the line/color exercise further with other subjects. Well, she really went for it and look at this pretty drawing she did. I couldn't be more proud!


Friday, April 10, 2015

First Friday Art Class for April 2015 - Line and Color...and Koi Fish

The idea for this class came from the fact that these girls are nearing the end of the school year and they're doing a lot of testing and finals and such. So I wanted a project that could be a sort of Art Therapy relaxation experience.

Remember when you were little and you'd scribble all over the paper and then use different colors to fill in the spaces? That's what we did today...but with a twist.

We began by watching this wonderful video on the 7 Elements of Art.
This video is excellent and really breaks each element down into understandable chunks. Before we watched I told the girls to notice how they felt about the Herni Rousseau painting when it was first shown and how they felt about it after gaining some new insight into it--after the narrator explores the painting and points out all the elements. That's the beauty of Art History and Art Appreciation. Once you study a painting or a particular artist, you can gain such a better appreciation for their work!!
I knew our project would take our whole class time today so after the video and discussion, we jumped right in. I was completely inspired by THIS PAINTING BY SHARON CUMMINGS and THIS DRAWING FROM PAM S. ON BACK TO THE DRAWING BOARD

Here are the steps for this Study in Line and Color Koi Fish drawing (as seen at the top of this post and down below):

1. First I had the girls trace a 4-1/2" x 7-1/2" template onto a 5-1/2" x 8-1/2" sheet of card stock. The reason I do this is so you have a bit of extra space around your edge to test out your colors and to extend your lines. This was done in pencil and then gone over with a Sharpie.

2. Draw your koi fish in pencil. They are basically an elongated teardrop with fins at the bottom and two small fins on each side. I suggested that the girls do 3 or 5 fish. Keeping in mind that the eye prefers odd numbers of items. It's also nice to have one or two elements going off the edge of the page. 

3. Add some lily pads--again in pencil. These are basically ovals with a small notch taken out of the side. 

4. Go over the fish and lily pads with pen (we are using Papermate Flairs--our GO TO art pens for this class). I suggest going over each element twice to emphasize them. You'll notice from my image at the top of the post that I don't try to follow the first line. I like the look of two lines--it seems sort of freer and more "scribbley" which is a look I really like. Erase any pencil lines that remain.

5. Now go over the whole page with free flowing organic, swirly lines. We went right in with our pen on this to make them more free and improvised. This is where you'll be glad your paper is a bit larger than your drawing space because you want the lines to flow all the way to the edges and beyond. Here you can add as many or as few lines as you wish. Channel your inner child and "scribble" on your paper!! *NOTE: the reason I suggest doing your pen lines on your fish and lily pads BEFORE this step is so it's not just one big swirly mess. This way the fish and lily pads are already very obvious and standing out. You'll see that after you do the swirly lines, the Koi and lily pads do fade a bit and you have to really watch where to add your color. 

6. And now the most fun and relaxing part--adding the color. Choose 3 shades of a color for your lily pads, 3-4 shades of a different color for your fish, and 4-5 shades of a third color for your water. And then just color in all the fun spaces you've created. I tried not to ever use the same color on spots right next to each other. But a few times it just happened and it's fine. That's the great thing about this project--it's really free and easy and yet the result is REALLY, REALLY pretty!

7. Cut around your Sharpie lines to clean up the edge of the paper. Mount on a 5-1/2" x 8-1/2" sheet of card stock.

Here are a few of the girls at work on their drawings. I think the steps above will make more sense when you see these Works In Progress.
 This wonderful artist started with the water which we all decided later was much harder than doing the koi and lily pads first. But it was fun for her to see her fish sort of POP out of the water as she colored because she was skeptical at first and the most hesitant to draw the scribbles on her drawing.

And here is her beautiful finished drawing:

 This artist chose really bright, fun colors for her fish so they almost glowed!
This artist is a bit older than the other girls in the class. :) She's a friend of mine that recently joined our class and all the girls were in awe of her wonderful drawing today. 

This is the finished drawing mounted on blue paper. Is this not gorgeous???

We talked about trying this same method with other subjects--not just fish. It would be so pretty with flowers or clouds or even a row of little houses set against a big sky, really so many things you could try. 

We had fun drawing Koi fish and snacking on Goldfish crackers and talking about art today! Next month will be our last class of this school year. Where has the time gone?? See you then!

4/14/15 EDITED TO ADD: A few of my students recently moved with their family to Oregon and we miss them dearly! I always send them the class re-caps so they can do the classes on their own at home. Well these little sweeties made it a family affair! For their Family Night the whole family did Koi Drawings. 

I got this message from their mom (and it totally made my day!!):
Camille finished her fish early so she experimented with bubbles in fall colors. We had a lot of fun. Thanks to your cool factor everyone was a willing participant in this great project. I am going to give Eric some colored pencils today and see what he comes up with. Instead, we just let him have his family home evening treat early while the rest of us colored last night. When people started to stray from your written instructions, Katie was quick to pipe up "There are no rules in Tiffany's art classes!"

Here are their lovely drawings:


Friday, February 6, 2015

First Friday Art Class for February 2015 - 3 Types of Lettering

We always seem to do some sort of lettering in February--I guess our thoughts turn to Valentines.

For today's class I decided to do 3 different types of lettering with the girls. All three are seen in the picture above--Faux Calligraphy (as seen in the words "february 2015"), a style I haven't named yet (as seen in the words "art Class"), and Art Deco Lettering (as seen in the word "Lettering").

(TIP: We found that working with our trusty Papermate Flair pens worked MUCH better than Sharpies! Of course Micron Pens are my first choice, but a little too pricey for kids.)
We began by talking about some general tips to keep in mind when doing any lettering...
We then dove right into style #1...
Faux Calligraph was our next style. I gave the girls a handout with basic cursive letters on it with the instructions to change any letters they didn't like. It's also OK to mix uppercase and lowercase. NO RULES--that's our mantra!
(Not sure why I wrote "cursive" instead of "calligraphy". I corrected it--post production).  :)
Our last style was the Art Deco Lettering...
Everyone did an amazing job!
Everyone's lettering has its own unique personality...all are lovely and wonderful!!


See you next month!

Friday, January 9, 2015

First Friday Art Class for January 2015 - Let's Draw Animals

We had our First Friday Art Class on the 2nd Friday this month because of the holidays. And this week we drew animals. Lots and lots of animals.

I began by telling the girls about how I like to draw animals. I like them to be fun, silly, and most of all cute. I can draw realistic animals...but I rarely do. To me it feels like work. And this class is all about having fun and having a relaxed atmosphere. So our animals are going to be fun, silly, and SO CUTE!!

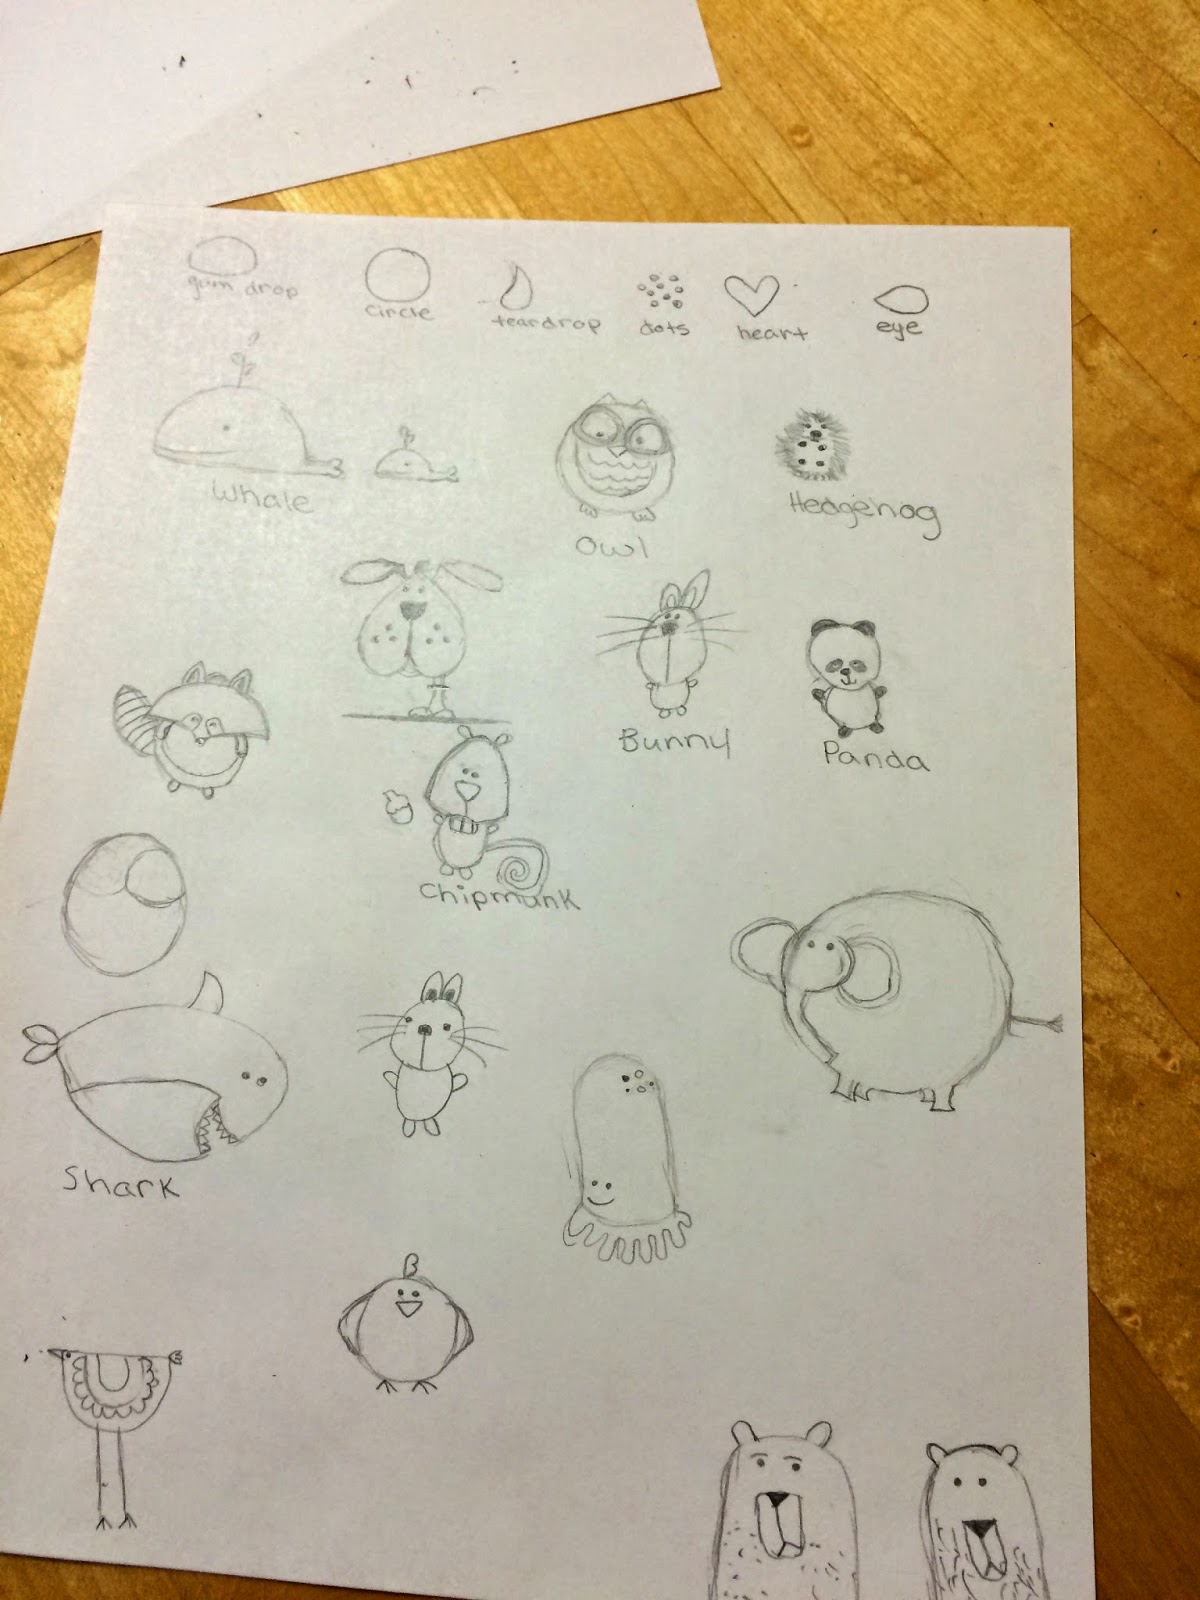
I had the girls draw a gumdrop, a circle, some dots, a teardrop, and a heart at the top of their page. Pretty much all of our animals will start with one of these BASIC SHAPES. When drawing with kids I love to start animals with basic shapes.

After class one of these little sweethearts told me, "I love how you do art because you make it so it's not so complicated. You make it so I really feel like I can do it!"--absolutely made my day! Yes! That is the goal. I want the girls to gain confidence and to feel comfortable with their skills. This is not a stuffy, learn the rules, get out your rulers so we can measure everything art class. We are all about fun and freedom!!

I spent lots of time before class sketching out several animals I thought the girls would like. And then I sort of made a list of what shapes they started with...(here are my sketches--we didn't get to all of these animals, but we did get to most of them)
Here's the basic list:

Animals that start with a gumdrop shape- 
Whale
Racoon (the raccoon came from HERE)
Bear
Squirrel
Squid

Animals that start with a circle - 
Owl
Bunny
Pig
Elephant
Bird
Panda

Animals that start with dots or hearts or other basic shapes -
Hedgehog
Shark
Dog (the dog starts with an upside down heart, but don't even bother with this one because the girls just giggled the entire time because it looks like a bum!! They called the poor thing "Butt Dog") :)

Ok...back to the lesson...I let the girls know to start every drawing with very light pencil lines because many of the lines would later be erased as they are just guidelines to help us get the shapes where we want them. Start light and then at the end you can go over and darken the lines that are staying.

And then we dove right in. I asked the girls if they liked to know before hand what we were drawing or if they just wanted me to guide them through and they could guess along the way. The wanted to guess--so fun and adventurous, these girls!!

Here are most of the animals broken down into steps:


Here are the girls hamming it up for the camera (and drawing):
We talked a lot about how changing the size and placement of elements in the drawing can completely change the look and personality of your animal. Here are their drawing pages and I think you'll agree they each have their own wonderful personality! (Looks like I missed photographing one of them--not sure how that happened...)


It was fun today to have a very laid back, relaxed class where we all just sort of sketched and laughed and talked together. I love these darling girls!!

Next month we'll be doing lettering so we can make some gorgeous Valentine's Day cards. See you then!

Friday, December 5, 2014

First Friday Art Class for December 2014 - Won't You Be My Neighbor?

We are creating little neighborhoods today in Art Class.

We began by talking about the Rule of Thirds and how it's more pleasing to our eyes to have the horizon line either lower or higher than the midline. Even in pieces where you're not going for realism--like our little neighborhoods.

We discussed the difference between a composition and design. For instance, if we made a bunch of these little houses and put them in rows with nothing else around them, that could make for a great DESIGN for fabric or wrapping paper. But today we did a full composition with foreground (either snow or grass), background (blue sky or any other color the girls chose), and our main elements (houses and trees). We also talked a little bit about Folk Art and how if we did several rows of these houses with each row having it's own little street or hill to sit on, that would give us a more Folk Art feel.

I then showed them my sketchbook where I keep several pages of basic house shapes to use as a reference when making these houses. When I see a new shape I like, I add it to my reference page. We drew several simple house shapes together.
I also gave the girls this Architectural Detail Hunt page from Art Starters by Ande Cook. I have this page laminated and keep it close when making houses. It's a great reference! I especially love all the window ideas. The girls loved that the handles on the French doors look like a mustache. :)
We talked about different tree shapes they could do--ranging from the very most basic triangle tree, to a bit more complicated two tone tree with a Y shaped trunk (as you'll see in their finished paintings).

I showed them examples of backgrounds I'd done and we discussed other ideas including attaching snowflakes cut with a tiny snowflake punch or just circles, adding clouds, and splattering paint onto your background. There are so many fun possibilities.

Then we talked about where our inspiration could come from when making our houses. You can do a theme such as a holiday or one particular color (I'm working on a pinks/purples neighborhood right now) or you can let the paper guide you or be your restriction (i.e., whatever piece I pick up next, I have to use somewhere), you can give each house it's own distinct personality. I told them to listen to the paper and let it "speak" to them...to which one of the little, clever cuties said, "I don't trust the paper." :) Hilarious!

And then one final tip before we got down to business...GLUE STICKS TO ITSELF BETTER THAN TO "NAKED" PAPER. Put glue on both surfaces for a better adhesion. We used Glue Sticks today, but normally I use Mod Podge. (For the girls today I figured Glue Sticks would be simpler and less messy).
I made one house from start to finish to show them my process. Here are the steps...

Step 1 - Cut out your shapes and lay them out to see where you want things to go. Always leave yourself room to glue since we are not assembling these on the background paper--they are free standing houses. So if you want your triangle roof to sit right on top of your rectangle house, leave a little overlap on the top of the house for gluing.
Step 2 - Outline the house, roof, and chimney. I find it easier to do this before gluing. I use Micron pens. The girls used a variety of pens today.
Step 3 - Glue all your pieces together (being careful to not glue it onto the table) :) and outline the remaining elements. It's so much easier to outline those tiny pieces like the windows and doors once they are glued down!

Here's a picture to give you an idea of size.
Isn't it so cute?? As the girls worked they talked about how these little houses looked perfect for little fairies or magic elves.

Step 4 - Glue the houses onto your background page. The girls are using 8-1/2" x 5-1/2" pieces of cardstock for their backgrounds. Add your other elements (snowflakes, clouds, etc.)
And here are all the finished projects.
 This artist created a lovely little Christmas village, complete with a beautiful snowy sky. Isn't it cozy?
 This artist wanted to have one large neighborhood Christmas tree...and a penguin peeking out of the snow.
 This creative girl wanted to have a snowy sky AND have her houses on snowy hills. I love the simplicity and the depth the two layers of paper give.
This artist put a lot of thought into her composition and decided to leave one of the houses she made out in order to get a more pleasing, balanced composition.  
 This cutie made all of her houses very tiny and added snow circles at the very last minute. She also distressed rather than outlined her foreground grass piece.
This artist wanted each of her houses to have their own distinct personality. And I think she achieved that beautifully!

We had lots of fun and hot chocolate at this week's class. What a great group! See you next month.
ETA (12/18/14): One of our sweet little artists recently moved. We miss her terribly, but she is doing the class online. She sent me a picture of her beautiful neighborhood. Her mom said she was mad they didn't have a paper punch for her snow, but I love her improvisation!

LinkWithin

Related Posts with Thumbnails