Some of these were wedding presents, some of them were Christmas presents. So I couldn't blog them until now. But they are all 4 in their proper homes now so here you go...
Friday, December 30, 2011
Thursday, December 29, 2011
Friday, December 23, 2011
Knitting Journal
Got the pattern HERE. I had to make it twice because I didn't quite follow the pattern on the first one, but they are both fun and pretty. Both were done on size US 7's and with Lily Sugar n' Cream yarn.
One of the radiating squares along with a Boxy washcloth were gifts for my sister. I love it when people request more washcloths. It means they liked them and they used them. Yay!
Oh, now this was FUN. I used Cascade Magnum and Gedifra Gigante on size US 15's. I used THIS PATTERN but only did one pom pom since I thought that was a little more boyish. I'll be making more of these I'm sure!
This is a bit of a Frankenstein project. The body I just made up, the eye and feet came from a Rebecca Danger Pattern (Penelope) and the knobbles on his head came from THIS PATTERN. This was so fun to make and my nephew loved it.
Sunday, December 4, 2011
Newest Name Signs
I haven't been making as many as I have in the past, but I do occasionally make them when people contact me directly. These two went in the mail last week.
Friday, December 2, 2011
First Friday Art Class for December 2011 - Christmas Cards
Okay, we got a little crafty this time. I try to the keep the class more art, less craft, but Christmas time lends itself to so many fun crafts. So we did artistic crafts. :)
This month we made 3 Christmas cards. We did paper pieced, mixed media cards.
Here are the cards we made (we started with the most simple and then moved to the more complicated):
Here is the handout for this month explaining all the steps to making these cards:
I'm going to let the handout and the actual cards sort of speak for themselves as far as instruction goes. But I do have a few tips when it comes to paper piecing.
1. Whenever possible, draw your shape on the back of the paper you're using. This way when you cut it out, the front will be nice and clean with no pencil marks on it.
2. Plan before you glue--this was especially true for our Ornament Card. The order on the handout is the order you need to go in to make everything overlap correctly and stay adhered on the card.
3. Make sure your glue extends to the corners. There's nothing worse than making a lovely card only to have the corners curl up because they weren't glued down well.
4. Simple is okay. Simple can be lovely and sophisticated as long as the design is well thought out and done well.
For time's sake I did have some parts of the cards already ready for the girls. I didn't want them to get bogged down with tying bows, cutting ribbon and curling wire.
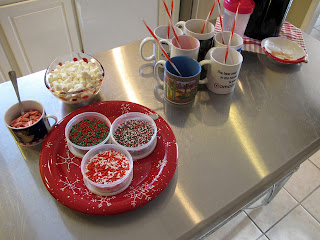
And since it was our Christmas class, we had a little Hot Chocolate Bar (think Salad Bar only LOTS more fun!)
See you next month!
This month we made 3 Christmas cards. We did paper pieced, mixed media cards.
Here are the cards we made (we started with the most simple and then moved to the more complicated):
Here is the handout for this month explaining all the steps to making these cards:
I'm going to let the handout and the actual cards sort of speak for themselves as far as instruction goes. But I do have a few tips when it comes to paper piecing.
1. Whenever possible, draw your shape on the back of the paper you're using. This way when you cut it out, the front will be nice and clean with no pencil marks on it.
2. Plan before you glue--this was especially true for our Ornament Card. The order on the handout is the order you need to go in to make everything overlap correctly and stay adhered on the card.
3. Make sure your glue extends to the corners. There's nothing worse than making a lovely card only to have the corners curl up because they weren't glued down well.
4. Simple is okay. Simple can be lovely and sophisticated as long as the design is well thought out and done well.
For time's sake I did have some parts of the cards already ready for the girls. I didn't want them to get bogged down with tying bows, cutting ribbon and curling wire.
Here they are hard at work--they look like busy little Christmas elves:
Here are their final creations:
Once again I gave them a starting point and they ran with it and extended beyond my expectations! Their cards were creative, fun and beautiful!And since it was our Christmas class, we had a little Hot Chocolate Bar (think Salad Bar only LOTS more fun!)
And these little artists even made their hot chocolate beautiful and artistic!
We also played a fun art game called Whatchamadrawit. I found it HERE and it's awesome!!
Fun, fun time. These girls are wonderful!! This was such a fun way to kick off the Christmas season.See you next month!
Subscribe to:
Comments (Atom)


