Showing posts with label crafts. Show all posts

Friday, June 18, 2010

4th of July Centerpiece with Fabric Pom Poms Tutorial

Just got my new Clover XL Pom Pom Maker. It is so fun! I've make pom poms with tulle, yarn, and fabric.  I specifically bought it to make fabric pom poms. I saw them here on Prudent Baby and loved them.

I made mine with red (striped cotton blend), white (cotton) and navy (polyester) fabric for a fun 4th of July centerpiece.

A few tips for the fabric pom poms:
1. At first I was really careful to wrap the fabric flat so there were no twists. Well, then my pom poms looked like stacks of fabric--not puffy pom poms. So as you wrap either your pom pom maker or whatever else you use, let the fabric twist and overlap a bit.
2. I cut the fabric into 3/4" wide strips. You could certainly go thinner, but thicker may make it harder to tied the knot around the center. I just cut them as long as my fabric and then overlapped them as I wrapped them onto the pom pom maker.
3. I tied these with matching yarn. It seems to tie a tighter knot than other things I tried.
4. For a solid color pom pom, it's best to use solid fabrics or fabrics that are printed on both sides. You can use cottons that are printed on one side. It just gives it a different look--more homespun/country.

To Make the Centerpiece:
I just stuck dowels into the yarn at the center of the pom pom. I didn't even glue them  because I use these dowels for other things. I put floral foam in the bottom of a pot I already had. Again, I just stuck it in and didn't glue is since this pot is usually my pencil holder by my computer. I stuck the dowels in the foam at different levels and filled in the top with floral moss. No glue, just tucked it in. A little jute bow around the pot finishes it off nicely. And everything is removable after the holiday. :)

I tried the pom poms outside first in my planter, but I thought they sort of got lost in the mix. I'm thinking of taking out the pinecones and filling the entire planter with floral foam so I can add all sorts of fabric flowers and pom poms. What do you think?

Wednesday, June 16, 2010

Rag Wreath for 4th of July


I've been seeing these everywhere online and I love them. So I had to make my own. And with the 4th of July just around the corner, red white and blue was my theme.

I bought 2 wreath forms. The green one is for a future wreath for my daughter's room. For this Patriotic Wreath, I used the 12" craft ring (macrame--anyone remember that?). The benefit of the craft ring is it's $1.99 (the green floral form was $3.99). And with the thin metal ring, you don't have to have very long strips of fabric--I cut mine to be just 8" long. I will have to cut them quite a bit longer when I use that green wreath from!


I got 2 or three styles of fabric in red, white and soft blue. I used some printed cottons (the whites do have a slight print to them), gingham, solid linen, seersucker, striped, polka dot and solid cotton.

I ripped the fabric into strips of varying widths--from 1/2" to 1-1/2". I then cut them down to be 8" long, using pinking shears to give the end a bit more interest and to avoid more fray. I tied the strips on in good ol' American Red, White and Blue order varying the fabric each go around.

The wreath is hung by a long strip of gingham torn fabric.


Tuesday, June 15, 2010

New Hair Flowers


I found a $3 4th of July artificial flower arrangement at Walmart today. It was awful! But I knew for $3 I could make something fun with the flowers.

I made both of these hair flowers using this method. The Patriotic Hair Flower if for my daughter. I just layered 3 of the flowers from the arrangement and used 3 beads in the center. She's excited to wear this for the 4th of July. The white and pink one is for my daughter's friend. The white is from the Walmart flowers. I then layered a soft pink one, a soft cream and a pink button. Very feminine! I still have 4 flowers left from my bargain arrangement--$3 well spent!

ETA: 06/21/10 - I went back to Walmart and the Dollar Tree and bought more flowers... :) More hair flowers are coming.

Sunday, June 13, 2010

Kid's Crafting - Cereal Box Cash Register

Using this post from Pane, Amore e Creativita as a guide, my daughter turned two cereal boxes into...


This fun cash register. My son printed the money for her. Not sure where he found those files. Should I be worried? :)


Saturday, June 12, 2010

Silk Flower Hair Clip Tutorial


My daughter and I got a little crafty this week and made some hair flowers for friends and cousins. Here's a quick tutorial on how to make them.

Supplies:
Silk Flowers (ours aren't silk, but what else do you call them?)
Alligator hair clips
Buttons or beads
Glue gun
Needle and thread
1/4" -1/2" wide ribbon
Small pieces of felt 

Step 1 - Take the flowers apart removing all the plastic centers and stems and backs. You can discard these. You don't need them for the hair flowers.
Step 2 - Layer the flowers together the way you want them. For this one, we did 3 different sizes of flowers on one hair clip.
Step 3 - Sew the button on. We topped this one off with a small pink button. You can also used beads. Sew a felt circle on the back as you're sewing on the button--creating a button, flower, felt sandwich.
Step 4 - Since the felt is only held on by a couple of stitches, tack it with some more glue around the edges.
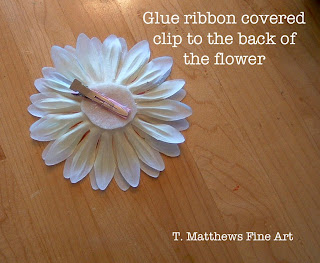
Step 5 - Attach the alligator clip. I like to cover the top of my alligator clips with 1/4" ribbon. This helps it to stick to the felt better.
Step 6 - Wear it proudly!

Thursday, June 10, 2010

Rolled Fabric Rose Hair Bow and More


There are wonderful tutorials all over the place for these rolled fabric roses. I personally do a combination of a few different methods. I tear a strip of fabric about 2" wide and about 14" long. I fold it over to make a thinner strip. I then just roll the fabric, holding the center between my thumb and fingers and going around and around until I have a rose I'm happy with. I do twist the fabric as I go to make it more interesting--this gives you a raw edge every once in a while which I like. Twist and roll, twist and roll. :)

Then, with a glue gun, I glue the end of the fabric strip down and put a lot of hot glue on the bottom of the rose, making sure to get some glue on each layer and some extra goopiness in the center. I then place the rose on a piece of felt. I do that two more times. (The smaller rose it just fabric that was shorter than 14"). Then I cut away the excess felt.

Then what? The green one above is a hair bow. I just added a little felt loop on the back to hold an alligator clip. This way the alligator clip can be removed and the roses can also be slipped right onto a headband.


I love giving these little hair bows as part of a gift--I always use them as the bow on the package. Just clip it to a card and attach it to a package and you're good to go. (This one was for my daughter's friend--a sweet 7 year old who LOVES hair accessories.)


I have also used the rolled roses around the house. The possibilities are endless. It's such a great way to add some country charm to an item and it's a great use for those small strips of fabric you have lying around the house!

Sunday, May 30, 2010

Fabric Wall Hanging - (Sort of) a Tutorial


We are in the process of redecorating my daughter's room. She has decided that pink and purple are so over and green is the bomb. So we painted over the purple walls she's had since she was one. We painted her walls a gorgeous soft green called Apple Slice. My husband built her a day bed (it's awesome!) and we painted that a darker shade of green. 

When I saw this entry on Make it and Love it, I knew I had to make my own version for my daughter's new room! I had all the supplies on hand--which makes me more happy than I can even describe. It's a weird thing with me, I know.

SUPPLIES:
Artist's Canvas (I used an 18" x 24")
Fabric
Staple Gun
Chalk
Paint
Brushes
Flower embellishments (you could use silk flowers, rolled fabric roses, I used singed fabric flowers)
Needle 
Thread

I started out by covering an 18" x 24" artist's canvas with the black and white fabric. (My canvas was black only because I painted over a painting gone wrong. You could use a white canvas.) I pulled the fabric taut and used a staple gun on the back to secure it.


I then drew out a vase template on a manilla folder and cut it out. I just cut out one side and flipped it over for the other side of the vase ensuring it would be symmetrical. I traced the vase and drew 3 stems onto the fabric with taylor's chalk.


Here's where I got so involved that I forgot to photograph the steps. But this is what I did: I painted the vase onto the fabric with the light green wall paint we'd used in her room. No need for fancy fabric paint--believe me I know how well paint sticks to fabric. I have several pairs of jeans that can attest to this! If you have fabric paint, use it, but it's not necessary. I painted the stems with the darker green paint we used on her daybed. 

I then attached 3 white fabric roses (made using this technique). I tacked them to the fabric with a few little stitches. I didn't go through the canvas--just the fabric. You could glue them if you wanted to. The larger flower needed a couple stitches near the top too so the flower wouldn't droop.


And really, that's it and then you've got a fun wall hanging! 


Saturday, May 29, 2010

Memorial Day Mini American Flag Bunting


I saw this little tutorial on Salt Water Kids. I decided to make my own no sew/no wash/no iron (yes, I AM a lazy crafter!) version using ribbon trim instead of fabric.

I used 1-1/2" wide white and red striped ribbon/trim that I had on hand. I cut 3/4" squares of denim fabric. I glued (glue gun) the denim to the ribbon and did a fabric paint star. I let that dry over night and then glued the tiny flags to some jute twine and tied it to my front door grapevine wreath. 

These little cuties will be perfect for Memorial Day and I'll leave them up through the 4th of July!


Saturday, May 22, 2010

Just Added to the Shop


I just added this fun Paris Cafe style chalkboard to my bumblebina ETSY shop. It's all decked out in a distressed frame and shabby chic fabric flower.

Thursday, April 15, 2010

Paper Rose Wall Hangings Tutorial

Supplies:
Some sort of base*
Paper
Glue gun
Spray paint
Ribbon, tulle, ric rac, etc. (for hanging)

*About the bases: Both of the wreaths were done on 1/4" MDF wreath forms. One painted black for the Halloween wreath and the other painted white for the cottage wreath. The Circle Wall hanging was actually the piece left over from the center of the black wreath's form after we cut it out. The frame was an old cheap black frame that I base coated with white and then glued on the roses.

Step 1: Draw a spiral on your paper. Here I am using magazine pages. Newspaper and books work well too. I like the size, thickness and glossiness of magazine pages. I drew the spiral with Sharpie because I knew for this one I'd be spray painting it black. For the white roses, I use light pencil lines. (And really after cutting a bunch, you won't even need to draw the spiral--you'll be able to cut it in your sleep!) :)


Step 2: Cut out the spiral and roll it starting with the outside, going toward the inside of the circle.

Step 3: At this point your spiral will be rolled quite tightly. I like to let it unfurl a bit. This gives you more of an open rose shape.


Step 4: Repeat steps 1-3 A LOT!


Step 5: When you have the rose unfurled to the size you'd like it, place a small amount of glue or tape at the outside edge to secure it. Then start gluing them to your form. I put a large glob of hot glue and plop the rose right in the center of it. This will hold the rose to the wreath and also hold the spiral in shape.


For this wreath I first went around with very large roses and then went back in to fill in the gap with smaller ones.

When I have all the roses glued on, I like to turn the wreath upside down just to make sure everything is very secure--you don't want any centers of the roses to come loose. If there are some that are loose, just squeeze some more glue down into the center and push the paper into it.

Step 6: Spray paint. (Sorry no pictures of that). For the black wreath I did LOTS of layers so that none of the text really showed through. For the white cottage ones, I do a light coating so some of the text comes through. I also choose my pages carefully for the white ones. I choose pages that are light with very few dark colors.

You can see below what they looked like before the spray painting. The black wreath actually looked really pretty. Without even thinking about it, I had used very dark pages. It would have looked fine without the spray paint, but I was specifically making a Halloween wreath so I did spray it.

Some other options I'd like to try:
1. Painting the pages before with acrylic paint so I don't need to spray paint with finished.
2. Leaving one "natural" (no paint) and burning the edges of the roses.

Black Wreath Before the Spray Paint

White Wreath Before the Spray Paint

Step 7: Attach your hanger. I generally use ribbon and bits of fabric, tulle, ric rac, etc.

Don't want to make your own? The wreaths have both sold as has the Circle Wall Hanging, but the  frame is available here. And keep checking back in my shop. I'll be making more.

If you do make your own, please link back to this tutorial so I can see your gorgeous handiwork!!


Monday, April 12, 2010

A Productive Afternoon

I saw this post from Tattered and Timeless a few weeks ago and was totally inspired. And then I completely forgot about it. :) Then this afternoon I was looking through my saved pictures inspiration file and came across the post again.

I had everything on hand to make something similar. I got the unfinished wood frame on ETSY a while back for $.97. I knew I could do something with it. For this project, I painted, sanded and distressed it. Isn't that blue delicious? I am in love with light blues right now. I want to paint everything in my house this color. :)

The framed text is from an old French workbook from college. The page was a bit too bright so I distressed it a bit by painting a watered down brown on it. The "JOY" is a sticker on the outside of the glass which adds a bit of dimension.

The flower was done using this technique. I used fabric from the clearance bin from my local craft store and (get this) an old Anakin Skywalker costume my son grew out of years ago. The Force is totally with this project!! :)

Here is it outside. (I find I get the best pictures outside.)


And here it is in it's new home on a shelf in my living room. 

Saturday, April 3, 2010

Yarn Wrapped Easter Animals Tutorial


Yarn Wrapped Easter Egg Chicks and Bunnies


Supplies:
Plastic Easter Eggs - it's best if they somewhat match they yarn you'll be using as they may show through in some parts
Yarn - The yellow we used is Lion Brand Homespun, the pink is something similar (not sure what exactly--it's long since lost it's label)
Glue Gun
Felt
Beads (or some other material for eyes)
Wire (for bunny whiskers)
Pompom (for bunny tail)
Feather


Step 1: Glue and Wrap - Start with a glob of hot glue on the bottom of the egg and attach the yarn. Then just glue and wrap until the egg is covered. We didn't bother to glue the eggs shut, but you could if you felt it was necessary. (She's very proud that I now trust her to use the glue gun WITH supervision!) :)


Step 2: Gather Your Supplies and Cut the Felt - For the bunny we cut ears from pink felt, put a bit of white in them and then pinched the bottom to give them some dimension. The feet are cut like a heart with the bottom chopped off. The nose is a rounded triangle. We twisted the wire together at the middle and then curled the ends. The tail is a large pompom. 


For the chick, it's a bit more simple. Just feet and beak and eyes (not pictured). We cut a triangle with a little notch out of the bottom and then cut the "feet" with pinking shears to give them "toes". The beak is an elongated triangle. Oh, and we added a kicky feather to the top of the head.


At first we did puffy paint for the eyes. It worked okay on the yarn but was a bit temperamental. We ended up gluing beads over the paint marks and liked the beads better.


Step 3: Assemble - Glue the feet to the bottom of the egg. Glue on the eyes and beak for the chick. For the bunny, we put a large dot of hot glue on the face, put the whiskers in the glue and then topped it off with the nose. My daughter also added little paws and a carrot and red cheeks to her bunny. Glue the ears to the back of the head and the tail to the back.

And there you go!!


LinkWithin

Related Posts with Thumbnails