Friday, June 14, 2013

Drawing People Summer Art Class - Day 5

Day 5 (our last day of class) - Putting it All Together

We did a really quick review of the steps we've been working on all week.
And then the kids got to work on their final drawing. They did this drawing in their sketchbooks. When they were finished we compared them to the drawings they did on Day 1. I love this part! It's so fun to see the pride and surprise on the kids' faces when they see their final drawing compared to their first drawing! I love it! They all want to get rid of their first drawings but I say KEEP IT. It's so fun to be able to compare and see the progress they've made.
Age 14

Age 13

Age 10

Age 11

Age 15

Age 14

I love that a lot of the kids stuck with the same basic age, hair style, and gender of the subjects of both drawings. This was done completely subconsciously since they haven't seen those first drawings since the first day. But that's sort of where the similarities ended. They all achieved wonderful realism and depth and emotion in their final drawings!

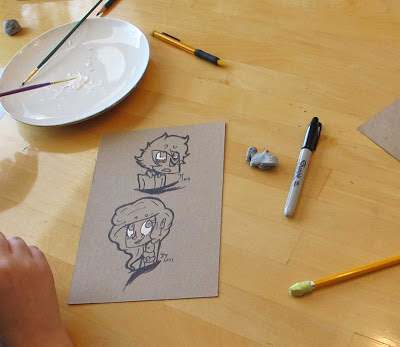
Then to kind of let our hair down and unwind at the end of our week together, we did some drawings on chipboard where we broke all the rules. (We used THIS METHOD that I discussed in an earlier post).


This was a GREAT group of kids and I thoroughly enjoyed spending this week with them!!

Take home assignment??
Practice, practice, practice. Drawing people is like doing anything else. It takes practice and the more you do it, the better you get!

Thursday, June 13, 2013

Drawing People Summer Art Class - Day 4

Day 4 - Light and Shadow

We've learned several ways already to improve our drawings of people. And today we are taking our drawings one step further by creating DEPTH with light and shadow.

Notice how each skill builds on to what we've already learned. First we learned where things go, then we learned what to put in those spaces where things go, now we'll learn how to create the lights and shadows on the features that go in the spaces. (I seriously love this process!!)

Our warm up exercise today was to begin a "Value" page in our sketchbooks. I had the kids each do their own value scale. I know there are tons out there that you can print, but I find that having them make their own really reinforces the concept and helps each artist to get a feel for the way they want to express dark and light values in their drawings.

I have them draw a long narrow rectangle on their page and divide it into 5 sections and label them 1-5. Section #1 is the highlight so we leave it blank and let the white of our paper be the highlight. Section #5 is our darkest value. Once you've filled in #5, fill in section #3 with a value right between #1 and #5. Then fill in #2 with a nice light value that's exactly between your #1 and #3. Then section #4 with a medium dark value that's right between your #3 and #5. I find that going in this order 1,5,3,2,4 is much more effective than going straight 1through 5.

Here's a sample of one of the students value scale:
We also talked a little about hatching and stippling. Notice her comment about stippling ("for crazy people")--yeah, I kind of agree. I just don't have the patience for that. :)

I then asked them to draw some circles on the page. Some as lightly as they could and some quite dark--trying for about a #5 on the value scale. I did this because I have some students that draw very lightly and need to be pushed to go darker and I have some that draw very darkly (dark? 'darkly' sounds weird) all the time and need to practice a lighter touch.

We looked closely at our trusty picture of Nicole Kidman and identified all the specific value areas.

And now onto the Head Template page to get some hands on practice:
On one of the faces we divided it up by value. We did this by using symbols for each value and this page can be used as a reference for future drawings. We talked about light source and we concentrated on three values--dark (a #5 on our value scale), medium ( a #3) and highlight (#1). And of course there's millions of values in between, but I find that breaking a drawing down into those 3 values at first is a great way to simplify and begin. Then you can go back in and add all the subtle in-betweens. (The middle part where you get to add in all the subtle value differences is my favorite part of a drawing!)

Recognizing values and value subtleties takes practice. That's why we approached this concept in a couple different ways.

Then on the other face on our template page we did what I call the Eraser Method. Here are the steps in photographs:


I love this method and use it on most of my pencil drawings of the face. It's a great way to get your light/medium value down quickly, efficiently, and evenly. Then it's just a matter of "drawing" the highlights with your eraser and then adding in your deep values and details.

I think the students were surprised at how great their faces looked! I like to take their drawings and hold them up a few feet away from the kids so they can see it from a bit of a distance and see just how much depth and realism they are creating.

Sometimes when you're so focused on your drawing, you forget to step back and appreciate it and look at it from a far. I also always encourage the kids to look around at everyone else's drawings too. I love to see them learn from each other!


No specific assignment for tonight. Just the usual...practice, practice, practice.

Tomorrow, our last day of class, we put everything together and do a final drawing and then compare that to our drawings from Day1. This is always very fun and rewarding! It's amazing to see how much they improve with just a week of instruction and some basic skills!!

Then if we have time, we'll do some funky faces and break all these rules we just learned. :)

Wednesday, June 12, 2013

Drawing People Summer Art Class - Day 3

Day 3 - The Facial Features

This is the process we've gone through so far:
1. As soon as students entered the class on Day 1 they drew a person. This drawing was set aside to be brought back out at the end of the course for comparison.
2. Basic introduction to drawing in general and to drawing people particularly.
3. We worked on placement -  where does everything go?
4. Okay, now we know where the eyes, nose and mouth go...let's draw some eyes, noses and mouths.

That is what we did today. Tomorrow we'll work on light and shadow and some final details and then on our last day, we'll put it all together. I think this is a great way to approach any drawing--break it down into accomplishable tasks, practice the parts, and then put it all together. (Good life advice too, right?)

Today we went back in our sketchbooks to the Eyes, Noses, and Mouths pages we made on the first day. I had some bowls set out on the table with features clipped from magazines. These were available to be used as a reference and also to be taped into sketchbooks if the students chose to do so.

Let's talk about drawing faces for a second:
A big part of drawing faces (or anything, really) is deciding what to draw and what to leave out. We talked about how people do have lines under their eyes and sometimes dark circles--but unless you're TRYING to make your subject look old and tired, leave out those unflattering features. Also, many things on the face are done with just a suggestion of a line or shadow--the bottom eyelid or side of the nose, for instance. They don't need a dark outline. In fact many times a dark outline can make your drawing look amateurish. It's also impossible to draw every strand of hair. Many times you just give the idea of the hair and add in some light and shadow and a few individual strands here and there.

Georgia O' Keefe once said, "Nothing is less real than realism. Details are confusing. It is only by selection, by elimination, by emphasis that we get at the real meaning of things."

We talked a lot about selection, elimination and emphasis today. The artist's job isn't just to draw it's to make decisions about what to add in and what to leave out.

We took each feature and drew them individually and even broke each of them down into smaller steps. This is a great way for, not just kids, but anyone to learn to draw. We found this handout to be VERY helpful:

We also went back to Nicole and talked specifically about her individual features.
She'll make one more appearance tomorrow to help us with light and shadow and then Ms. Kidman will be finished with our art class. Or should I say we'll be finished with her. 

And then we practiced, practiced, practiced.
 This young artist is AMAZING. Basically she could be teaching this class. The girl's got skillz!!
 I don't normally show the students their drawings from the first day again until the last day of class. But for this artist I just had to show it to her quickly so she could see just how much she's improved in just 3 days!
 This artist (who belongs to me) :) always complains about drawing eyes, but today she got a couple eyes drawn on her Eye page that she was really proud of. Ah, success!
 Wish I would have taken a picture of the finished drawing of this one. It was wonderful and so creative. Last minute she decided to add a little flair with a hat--this is my future fashion illustrator. She always adds something whimsical and creative to her drawings.
 I love that this artist not only added a reference picture to her sketchbook, but also wrote some notes around it. She is also always bold and brave enough to try her drawings in pen as well as pencil.
This artist much prefers anime, but he stepped out of his comfort zone today and ended up with some wonderful drawings...and then went back and drew some anime. :)

Optional Take Home Assignments:
1. Keep practicing eyes, noses, and mouths. And then put them together on your egg shape head we worked on yesterday. 
2. Keep gathering pictures for your Art File - specifically people and facial features

Tuesday, June 11, 2013

Drawing People Summer Art Class - Day 2


I realized yesterday that I didn't give much explanation of our class and why we are doing it. So here it is--I love kids and I love art. It makes me sad how little art instruction kids are getting in school right now and I truly feel like I, personally, have to do something about it. So I open my house to kids and we make art together and we talk about art together and I LOVE IT!! and I hope they do too. And then I put explanations and class re-caps on my blog for my students, their parents and anyone else who may end up here.

Okay...

Day 2 – Proportions
We began today with Blind Continuous Contour Drawings. This is done with one continuous line, and no peeking! Look at the person across from you. Draw them without picking up your pen/pencil and don't look at your paper. We did several in our sketchbooks.

Why Blind Continuous Contour Drawings?? Here's a great explanation from Drawing with Children by Mona Brookes: One of the best ways to get over the fear of drawing people is to draw without looking at the paper. It removes the artist from the responsibility of result, and allows him to study the subject more closely. Yes! I love this idea. I also really like to start each class with a sort of warm up/loosen up type exercise.

I did a few samples last night to show the kids. I honestly find these drawing so fun and relaxing. You never know what you might get!! (Try some!)
Here are some the students' drawings:

We found it very interesting that everyone's drawings had their own distinct style.

Drawing the Face
Drawing people is best done from observation, but there are a few guidelines that help you get started. These simple guidelines will help improve your drawings immensely!

There are 4 basic face shapes – round, heart shaped, oval, square. Today we used an egg shape as our inspiration. For this we used actual eggs. I had the kids draw the horizontal and vertical midline. Having an actual egg to hold in their hands seemed to help them get the concept of the shape better.

We used some visuals to talk about common mistakes made in drawing people. Noticing these downfalls and avoiding them in your drawings can take your drawings from immature and childlike to more mature and realistic looking.

I drew a face on a clear page protector. I drew many of the common mistakes people make.
Eyes too high – remember to leave room for the brain
No room for the hair – they look bald
No eyebrows or “rainbow” eyebrows
Outline of the nose is too dark
“Pig” nostrils
“Banana” lips
Eyeballs too big
Ears too small
Stringy hair or, alternately, helmet hair


I had all the labels covered with Post-It notes and the students named all of them. But for them to really SEE what was wrong with the drawing, I slipped in a photograph of a face. This seemed to really drive the concept home. "Oh yeah, I can see how the eyes are way too high and the hair is weird..." etc.

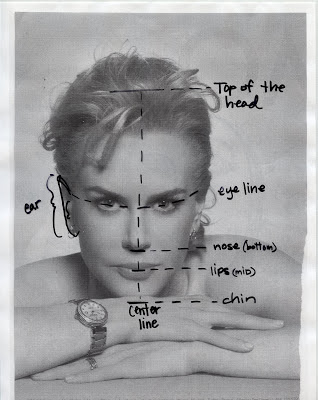
Using the same picture (a copy of it, actually) we then talked about all the measurements that will help us draw more realistic faces.
Here are the basics:
When starting a drawing of the face, divide the "egg" in half vertically and horizontally. The horizontal line will be your eye line (#1 below). Now divide the top half in half. That midway point will be your hairline (#4 below). Divide the bottom half in half. That notch mark will be the bottom of the nose (#2 below). Now divide from nose to chin in half and that notch mark will be the mouth (#3 below). By simply doing these quick measurements, you'll get much better proportions and placement on your face. Do all these lines and notch marks very lightly as they will most likely be erased eventually.
I love that by just making those few quick lines and tick marks, you already have the idea of a face. And voila, now you know where things need to go. Tomorrow we'll be working on the actual features.

And then we practiced. We did a little with the full body too. Basically I tried to convince them that yes, really, people are about 7-1/2 heads tall. I don't think they were convinced. They'll need to do some observation on their own.


Optional At Home Fun Playfulness (not homeWORK!):
1. Do more Blind Continuous Contour drawings
2. Collect pictures for you Art File
3. Take a magazine picture of a face (someone looking right at the camera--like our Nicole Kidman example), cut it in half vertically and draw the other half. This is a great exercise for practicing placement and proportion!

Monday, June 10, 2013

Drawing People Summer Art Class - Day 1


This class is for kids ages 10-15. There are 6 kids in the class. Today was our first day. This is a re-cap I send to the parents and students, but if you happen to wander onto my blog and find this information useful, great! Let me know and link back to me if you use it. 

Day One– Intro and Basics 

1.    Pre-instruction drawing
a.    Put your name and age on the paper and draw a person. This is done on a loose sheet of paper and I keep the drawing until the end of the week. Students are given about 10 minutes on this drawing. We will re-visit this drawing at the end of the week to compare it to our final drawing--done after all instruction is finished. I love to start my Drawing People classes this way. I think it's a great way for the students to see how much they can improve in just a weeks time!

2.    Intro to Drawing
a.    Basic Supplies – no. 2 pencil, kneaded eraser, sketchbook and/or loose paper
b.    Sketchbook vs. loose paper - some people are intimidated by a sketchbook and afraid to ruin a page in it. If that's the case, use loose pages until you feel more comfortable. 
c.     Draw: (from Drawing Lab for Mixed-Media Artists by Carla Sonheim)
                                               i.     Things you like - if you HATE drawing horses and the thought of practicing drawing horses makes you cringe, don't draw horses!
                                             ii.     With materials you like working with - some people like to draw with pen (I do!), others hate it. Some love the mess of charcoal, others (myself included) don't.
                                            iii.     Using styles, methods, or processes you like - if you love fashion illustration, go for it! Don't completely limit yourself to just one genre, but if something speaks to you, explore that.
d.    Why I like drawing
                                               i.     It’s quick - you can do a quick sketch in a matter of minutes. That can be it or you can return to it later to add more detail
                                             ii.     It’s portable - throw a small sketchbook and pencil in your bag and you're ready to go
                                            iii.     It’s fun
                                            iv.     It’s a way to express yourself creatively - I have several different drawing sketchbooks going at all time (people, lettering, fashion, etc.)
e.    Have your supplies handy and get them out and just see what happens - not feeling inspired? Just get out your sketchbook and pencil, sit with if for a bit and see if something comes to you. See if you just start doodling. Or see if a full detailed drawing wants to emerge.

3.    About Drawing People
a.    We looked at some of my samples—both realistic and funky, both straight graphite drawings and mixed media work (if you want to see more, feel free to explore this blog)
b.    There are rules
                                               i.     Rules, in art, are made to be broken
                                             ii.     To break the rules, you must first KNOW them. Then it’s a choice, not a mistake. (We will begin with the real math of drawing people tomorrow)

4.    In the sketchbook
a.    Make an “Eyes” page, a “Noses” page, and a “Mouths” page - we will be adding to this all week
b.    Start an “Art File” now - this is a folder or a box full of picture you gather, pictures that speak to you. I have several sections in my art file (I use a pocketed folder)--technique (the work of other artists that inspires me), faces, fashion and full body pictures, food/flowers, animals, design, and misc. Your categories will be different than mine. Or maybe you don't like categories. Figure out what works for you and start saving pictures.


5.    Let’s Get Started
a.    Gesture Studies using an art mannequin, magazine pictures, or imagination

Here are some samples of the students gesture drawings:


Take Home (Optional -- this isn't school!) Assignments:
1. Do more gesture drawings
2. Start looking for pictures in magazines for your Art File
3. Practice the Grid Method - this is another very useful tool in drawing people

LinkWithin

Related Posts with Thumbnails