Pages

Monday, December 24, 2012

Children's Nativity Drawings

A few weeks ago as part of our lesson at church we had the little ones (ages 3-12) draw pictures from the Nativity. I took them home and made this banner to be displayed at our Christmas party and in the church until Christmas. I am so inspired and touched by these wonderful, young artists. 

Didn't they draw the sweetest things?? (We even ended up with a very Ninja-esqe, sword wielding Mary and Joseph--what Nativity would be complete without that?) :) 


Friday, December 21, 2012

Newest Name Sign

This was a Christmas gift for my daughter's teacher.

Tuesday, December 18, 2012

IF - Snow

I drew this little lady while dreaming of snowy days...but she sort of ended up looking like she's ready to pull a bank heist.

Illustration Friday - the them this week is SNOW

Saturday, December 8, 2012

Newest Name Sign

This one was made for a cute friend who just started teaching kindergarten.

Friday, December 7, 2012

First Friday Art Class for December 2012 - The Nutcracker

Our theme today was, of course, Christmas--specifically The Nutcracker.

We began by making THESE SNOWFLAKE BALLERINAS from krokotak. (Their instructions are wonderful and they even have the ballerina template for you to print.)
We took them one First Friday Art step further and decorated them and gave them faces and hair.
They turned out so cute and each girl took supplies home to make a couple more.
We didn't have a chance to do these in class, but the girls took home a template to make TINY, TINY ballerinas like this...
Here's the template if you're interested. She should print out to about 4" tall and a snowflake made from a 2-1/2" x 2-1/2" piece of paper is just right for her. (This is all very fortuitous since you have a 2-1/2" strip of paper left once you cut your 8-1/2" x 11" paper into a square for the larger snowflakes. So with the little scrap left from a big ballerina, you can make a tiny one.)
After our ballerinas were complete we moved onto Nutcrackers. This project was inspired by THESE GREAT NUTCRACKERS from Alisa Burke. She did hers on wood. I knew we wouldn't have time for that so we did ours on paper.

(Side Note: I really enjoy drawings where the parameters of the paper are your limitations. I think it forces creativity and makes for a very interesting finished product.)
Here's a Draw a Nutcracker handout that helped them get started...
How to Draw a Nutcracker in 4 steps:
1. Start with a rectangle - either drawn or cut from paper, tall and thin or short and stout--whatever you prefer
2. Draw the face shape. We did a straight horizontal line with an upside down ant hill below it. Leave yourself room for the hat when you draw the straight line. You can do a giant hat and tiny body or a tiny hat and giant body or something somewhere in between.
3. Add the facial features, including (of course!) big teeth
4. Add all the other details including hair, clothing, accessories, etc. (We looked at pictures of Nutcrackers and noticed they have swords or drums, most have mustaches, their uniforms are very detailed with lots of buttons and medals and amulets.)

They really took this idea and ran with it. They were planning to draw their entire families in the form of Nutcrackers when they got home. :)
And our Christmas class just wouldn't be complete without a festive treat. I saw these JELLO HOT COCOA PUDDING MUGS a few weeks ago and knew they'd be perfect for our December class. (Also I have a weird obsession with food that looks like other food. Seriously, I  L O V E  it!)
(Modifications: I couldn't find plastic shot glasses so I used small Dixie cups. I used Pull n Peel licorice for the handle because my mugs were a bit too short to use the pretzels. Also, I added 2 pieces of Cookie Crisp cereal to the plate to complete the look. Next time I may just make a small cupcake and use that for the "mug" since we're not big gelatin or pudding fans in our house. But the girls did go crazy for these!!)
All in all a great, festive class with a wonderful group of girls!! Merry Christmas. See you in January.

Friday, November 23, 2012

IF - Whiskers

Illustration Friday - theme this week is whiskers.

Tuesday, November 6, 2012

Sunday Sketch - 11/4/12

Obviously my Sunday Sketch was greatly inspired by our First Friday November Art Class.

Saturday, November 3, 2012

First Friday Art Class for November 2012 - Zentangle, Part 2

We had so much fun with the Zenspiration inspired class last month that I decided to continue with that same sort of drawing concept this month.

We started by drawing Repeat Pattern Stacks from Cindy at Rainbow Elephant. This is a really fun drawing exercise and can have endless possibilities for practice at home. Her handout is excellent (found HERE) and I like for the girls to have something to take home to remind them of the steps so they can practice.

We then moved on to Cruffles from Sandy Hunter at tanglebucket. They were so fun because the girls took the concept and ran with it. They were designing chandeliers, earrings, bracelets, dresses full of Cruffles, etc. The Cruffles really popped when they started adding color to them too!

The Cruffle worksheets can be found HERE and, again, they are excellent!!


The last concept we worked on were Coils from Sue Jacobs. This one is tricky at first, but Sue breaks it down nicely and makes it easy. And once they got it, the girls really had fun drawing coils around lollipop sticks and flower stems and all over their papers. 

I really think learning these types of design/doodles help you loosen up in your drawing and they help give you a fun concept to take and manipulate and change and make your own.

The girls did great and really got creative with these fun concepts!!
I'm imaging a month of sketchbook pages full of stacks and Cruffles and coils and stacks of Cruffles with coils around them! :)

Friday, November 2, 2012

IF - Shy


Illustration Friday - the theme this week is SHY

Wednesday, October 31, 2012

Friday, October 19, 2012

IF - Sky


"Bright Tonight" by Garbage


From the beginning, we were always going to fail
We were the next thing that the world could not wait to tear down
Off balance in our own minds
Off balance in the ways we looked to everybody else
On and on all summer long, we never stood a chance
Sky bright tonight
Live forever always bright tonight

Hey you
You be who you are
You be who you are forever
You be who you are
You, my brightest star across the sky
You're bright tonight

It was right now and then suddenly it's gone
We were both wrong, but here we are, we're right where we belong
Off balance in our own lives
Off balance in the ways we looked to everybody else
On and on all summer long, we never stood a chance
Sky bright tonight
Live forever always bright tonight

Hey you
You be who you are
You be who you are forever
You be who you are
You, my brightest star across the sky
You're bright tonight

You shine so bright
 

Friday, October 12, 2012

First Friday Art Class for October 2012 - Zentangle, Part 1

Today's class was completely inspired by Joanne Fink's Zenspiration lettering and design.

We began by talking about what 'zen' means. We also talked about when you have a large task to do, how do you do it? By breaking it down into smaller steps. Art is the same way. If I had shown the girls the letters at the beginning of class and just told them to have at it, they would have thought I was crazy. But by the end, they could do it!

We first began by learning Joanne's basic patterns. We concentrated on four lines and a circle, swirls, triangle and fan since those are the ones Joanne seems to use the most. (All Zenspiration handouts were printed from HERE).

Then we looked at the FRAMES and BOARDERS worksheet as something simple we could do with our newly learned patterns.

We then watched Joanne at work as she drew her butterfly. You can find the video HERE. After that, the girls got to work doing their own butterflies, using the handout from the above linked site.

This is seriously the quietest I have ever seen this bunch. They were utterly engaged and totally concentrating!
They used their Papermate Flairs that they got last month and worked in their comp books to begin.

I think the butterfly is a great place to start. It's simple and helped the girls gain confidence in their ability to grasp the concepts. (It also helped them immensely to watch the youtube video and then go do it themselves!) They were encouraged to try the heart at home.
We then watched THIS video from Joanne on patterned monograms. She has a great teaching style and a very calming demeanor. I quite like her.

I printed the full alphabet for each girl, but I also made individual worksheets for the girls with their own initial. I thought this would help them get started.
We decided that it would be fine if they wanted to trace step b as their guide to start their letter. They worked on 4"x6" blank index cards, which worked wonderfully. Great size, nice thick paper, not too intimidating (i.e., there's plenty more if you mess up). :)
They all did a wonderful job and were quite proud of their monograms! And with good reason--they were gorgeous!!
And yeah, we did get a little bit silly...

What a fun group! I'm so glad class is back in session. I'm already brainstorming ideas for next month!! See you in November...

Wednesday, October 10, 2012

IF - Mirror

My new avatar--it's like looking in the mirror! :)

Illustration Friday - the theme this week is MIRROR.

Friday, September 28, 2012

Today's Face - 9/28/12

(Papermate Flair, Prisma markers, gesso)

IF - Book

Illustration Friday - the theme this week is BOOK

Sunday, September 23, 2012

Sunday Sketch - 9/23/12

(ballpoint pen, Prisma colored pencils and gesso on paper)
Specifically, this drawing was done on the back of a university parking pass from a football game I went to last night. I found myself at church with very few drawing surface possibilities. That rarely happens but I was able to pull out this little piece of bright pink cardstock from my purse and happily sketch away (while listening intently to the service, really!!).

The color was added once I got home. I love using Prisma colored pencils on bright colored or dark or black papers. Especially if you stick to colors with a lot of white in them, they just seem to pop right off the page.

Friday, September 21, 2012

If - Crooked

Lola does NOT trust her blind date. He seems crooked somehow...

Illustration Friday - theme this week is CROOKED

Tuesday, September 18, 2012

IF - Burst


In a burst of creative energy I created these fun drawings to demonstrate a song we sing with the kids at church about the wise man and the foolish man.

I found the sand and rock scrapbook papers at Hobby Lobby and I just knew they'd be perfect to illustrate the song.

Illustration Friday - the theme this week is BURST

Sunday, September 16, 2012

Sunday Sketch - 9/16/12

(ball point pen on the back of my church lesson plan)

I used to prefer working with ball point pen, but now whenever I work just with pen, I miss my Prisma markers. (But much as I'd like to, I don't drag my large drawer of Prisma markers to church.) I don't seem to be able to stop with the shading when working in pen. Thus the poor girl on the right seems to be a bit over-shadowed and tired looking. She really needs some rest and a good massage, I think.

The girl on the left is wishful thinking pure and simple. Her ski hat and snowflake shirt are slightly premature since we're still in the 90's everyday here in the Southwest. But cooler weather IS coming!! We may never have a need for a ski hat, but soon we'll need our jackets...right?

Friday, September 14, 2012

First Friday Art Class for September 2012 - Gearing Up

Once a month I teach a little art class for my daughter and a few of her friends. We took a break for the summer, but we are back!

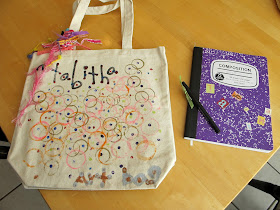
Today we're gearing up for the year--literally. The girls decorated canvas bags that they will use all year to hold their art supplies.

The night before I stamped their names on the bags with large rubber stamps and paint...
As soon as the girls arrived they got to work with paint, plastic lids, cotton swabs and ribbon...
(notice how well protected each girl and my dining room table are--we tend to get a bit messy at times) :)

Here they are with their finished bags...aren't they a cute bunch????
I then gave each girl a composition book and a Papermate Flair pen (my new favorite drawing instrument!) to use for the year. They each have their own personal sketchbooks too. The composition book will be used for lettering and class notes. I put their names on everything because it's fun and they won't get all mixed up while they're here for class.
I showed them my composition book so they could get an idea of what to do in theirs. I practice lettering all the time--at church, when I'm watching TV or a movie, making "To Do" lists, whenever. This page was done while watching Hugo with my daughter...
Then we got right to work on the first page of their comp. book...
I may introduce them to a new type of lettering each month, not sure. But we will most certainly be adding to the comp book each month.

This was a fun start to our year and now we're all outfitted and ready to create and look good while we do it!!